FPPF: Advanced Photography Workshop, 2nd Day
The topic for this week are:a) photojournalism
b) studio lights
Too bad! The theme for our photo essay is the May Festivals... (groan) The festivals suggested are...
a) Obando, Bulacan --> May 17, 18 and 19
b) Pahiyas at Lucban, Quezon --> May 15
c) Carabao at Pulilan, Bulacan --> May 14
Good thing, we were able to convince our instructor, Mr. Ed Santiago, that we can also submit about Election 2007. (Yes!)
Studio Lights:
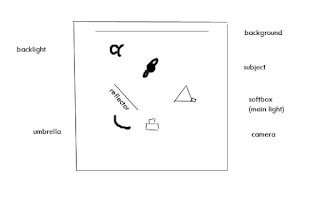
a) Main light
b) Fill-in
c) Back light (hair light)
d) Kicker light (light that shows the contour of the face)
Light Modifiers:
a) Diffuser
b) Bounce
c) Honey comb (spot)
White Balance -- 6400K Color Temperature
For reflections (like eyeglasses), move to check angle of reflection to 90 degrees.

Main = f/11
Fill = f/8
Back light = f/16
* Camera's apperture is set to the main light's apperture
Spot Lighting
* Lighting only one half of the face
* Be sure light does not spill to the background
* Usually used for men because it provides texture
Butterfly
* Light is in front and top.
High Key
* Light background with another light source
* Be sure no white balance shift
To create a vignette in Adobe Photoshop:
* Duplicate image
* Curves
--> For low-key, move upper most point 1/4 down.
--> For high-key, move left most point up-way.
* Create an oval marquee.
* Select>Inverse
* Select>Feather
* Create mask (in Layer template)
To turn black and white to sepia, more red and more yellow.
To create a border or make the correct image size for printing:
a) Open image to be printed.
b) Create new image, adjusting width, height and resolution.
c) Go to original and alt-drag image to new image.
d) Adjust image (new layer)
e) Effect Stroke for a border on the dragged image.

0 Comments:
Post a Comment
<< Home